A table editor is a tool that helps to create, alter, and drop a table. MySQL table editor is a graphical user interface that simplifies the table editing process. It provides feature-rich SDKs and Management tools like Visual Studio and SQL Server Management Studio.
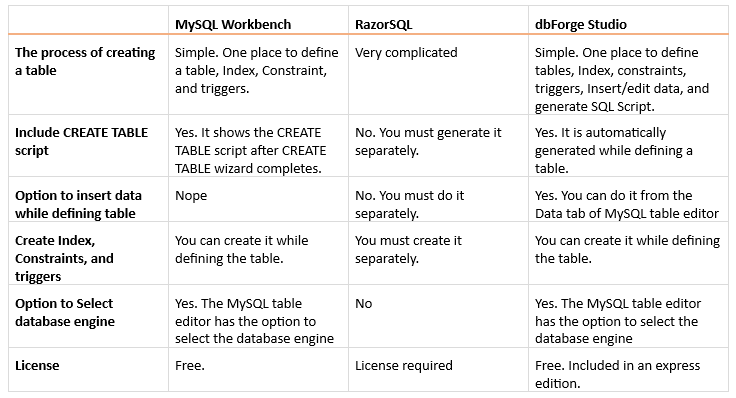
Some tools available in the market can be used to create, edit and manage a table. There are several industry-leading and feature-rich tools named dbForge Studio for MySQL, MySQL Workbench and Razor SQL that can be used for editing the table. The dbForge Studio for MySQL provides a way more advanced feature than MySQL Workbench and RazorSQL. The dbForge Studio for MySQL offers a feature-rich table designer that can help any developer or database architect to create a table from one place. Following is the list of advanced features that is available in dbForge Studio.
Let me show you how simple creating a table in dbForge Studio for MySQL is.
Table designer by dbForge Studio for MySQL
In this article, I show how to create a table using dbForge Studio for MySQL. I am going to explain it with a simple use case.
I assume the reader is familiar with the syntax of CREATE TABLE in MySQL. If you are new to MySQL database servers, you can read a document to learn more about tables in MySQL and how to create them.
I have created a database named VMEnterprise. The database is of an architect firm. We store the details of the employees, projects, and project assignments in three tables. Following are the details of the columns and their description.

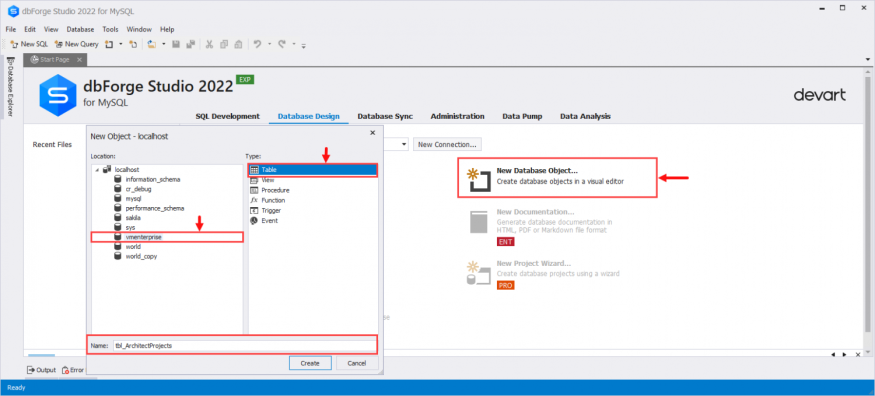
Now, let us create the tables according to the above table structure. First, we create tbl_ArchitectProjects which stores the list of projects assigned to the architect firm. Open dbForge Studio for MySQL ➜ Click on Database Design ➜ Select New Database Object. A dialog box New Object opens. Select VMEnterprise from the Location list box and Table from the Type list box. Specify tbl_ArchitectProjects as the Table name. See the following image for reference:
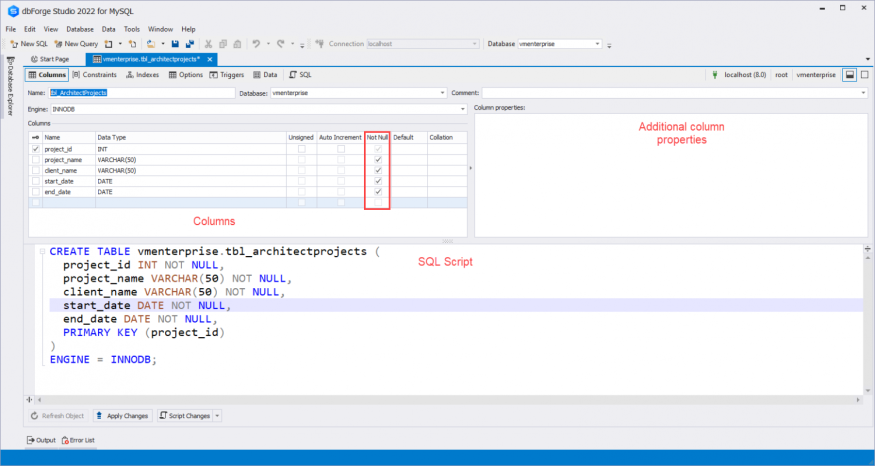
A MySQL Table Editor opens. You can see various options and menus to help create a table. You can see various tabs on the top menu to create the following table attributes.
Columns: You can add a column list with datatypes.
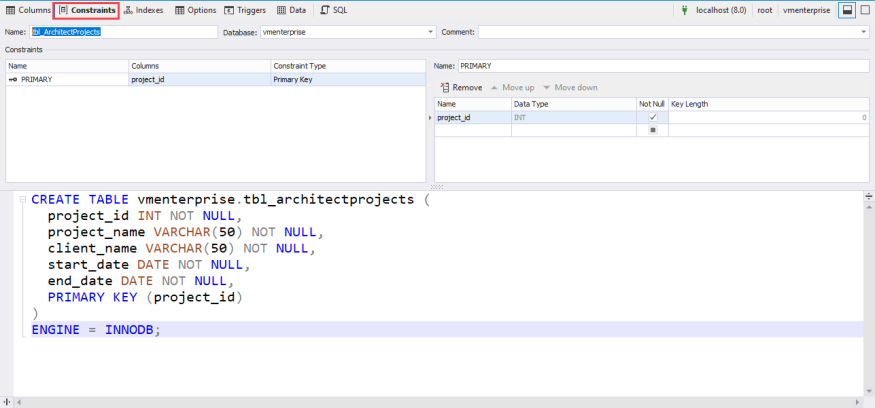
Constraints: You can add constraints that are used in a table.
Indexes: You can add various indexes that are used in a table.
Options: You can specify different configuration options for a table.
Triggers: you can create a trigger that can be used in a table.
Data: You can view/insert/edit the data within the table.
SQL: MySQL table editor generate a CREATE TABLE statement.
See the following screenshot for reference:

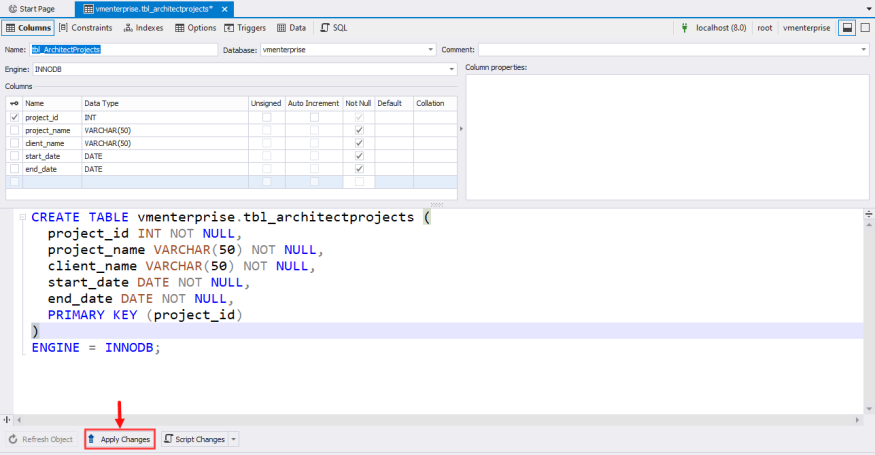
First, let us add columns to the table. To do that, select Columns.
You can see three sections. The first section adds the columns and their datatype in a table; the second section sets additional column properties. The third section contains the CREATE TABLE script of a table you are creating. Along with that, you can enable/disable other parameters like
Unsigned: If you do not want to allow the value of a column below zero, then you can enable it by checking the Unsigned. The project_id column is an Auto Increment field, so it is a signed integer.
Auto increment: This option makes a column an auto-increment field. The option becomes enabled when you make it a primary key. The tbl_ArchitectProjects contains a project_id column which is the primary Key and an Auto Increment field; therefore, I have checked a Primary key and Auto Increment check box.
Not Null and Default: Not Null and Default constraints can be enabled by selecting the Not Null and Default check box. The project_id column is the primary Key, so the Not Null check box will be checked automatically.
Collation: you can select the collation of the column.
I have added other columns and their datatype according to the table structure. Based on the option I have selected, you can see the CREATE TABLE script. See the below image for reference:
You can view the Primary Key of tbl_ArchitectProjects in the Constraints tab, which looks like the following image:
To create the tbl_ArchitectProjects table, click the Apply Changes button at the bottom of the table editor.
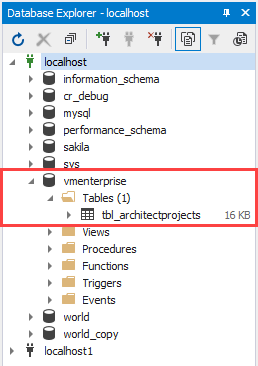
Once the table is created, Expand the connection (localhost) from Database Explorer ➜ Expand VMEnterprise ➜ Tables. You can see that the tbl_architectprojects have been created successfully.
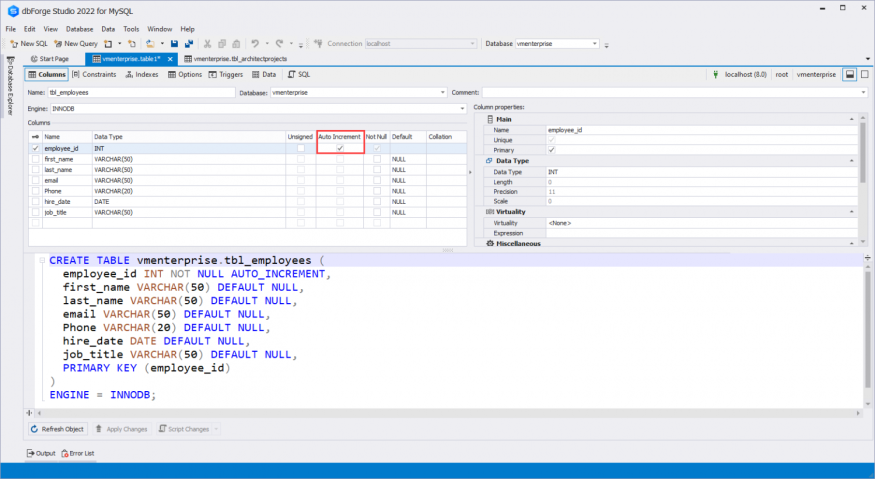
Now, let us create a table named tbl_employees. The table structure is the following.

The MySQL table editor screenshot for the above table structure is the following:
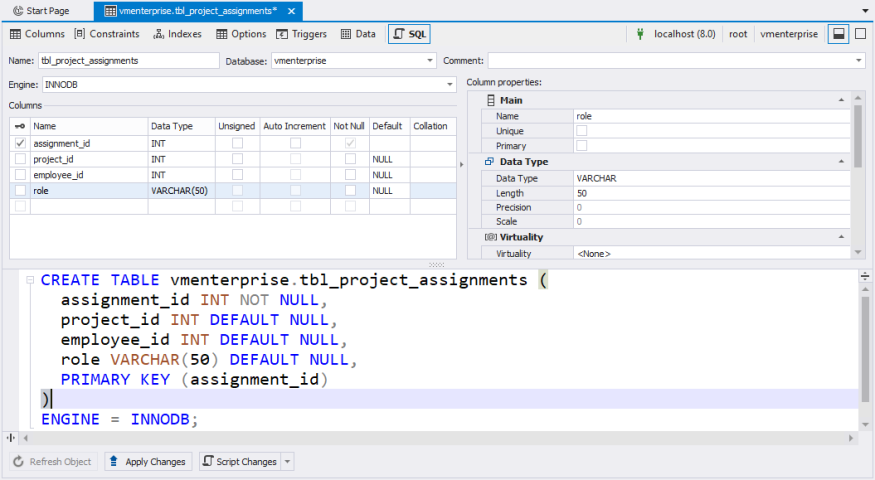
Now, let us create a table named tbl_project_assignments.

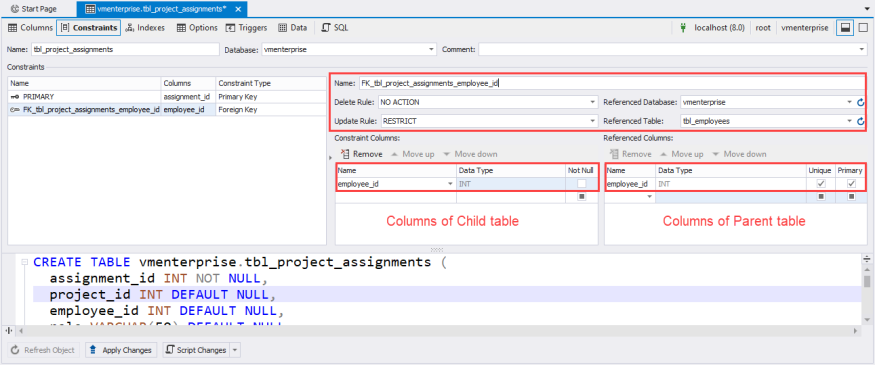
As you can see, the tbl_project_assignments table contains two foreign keys in the employee_id and project_id columns. The screenshot of the table structure is following:
The options to create a foreign key are in the Constraint tab. In the Constraint tab, you can see three sections. The first section contains the name and details of the Foreign Key. The second section contains the definition of the foreign Key, which contains the following information:
- Name: Name of Foreign Key. In this demo, the name is FK_tbl_project_assignments_employee_id.
- Referenced database: The parent database name. In this demo, the parent database is VMEnterprise.
- Referenced Table: The parent table name. In this demo, the parent table is tbl_Employees.
- Delete Rule: The action performed on a child table when a record is deleted in the parent table. In this demo, the Delete Rule is NO ACTION.
- Update Rule: The action to be performed on a child table when a record is updated in the parent table. In this demo, the Updated Rule is RESTRICT.
- Constraint columns: The constraint columns are the child table's column which references the parent table's primary key column. In our demo, the employee_id of the tbl_project_assignments column references the primary key column of the tbl_employees table. Hence, I have selected the employee_id column in the constraint column and referenced column.
See the following image:
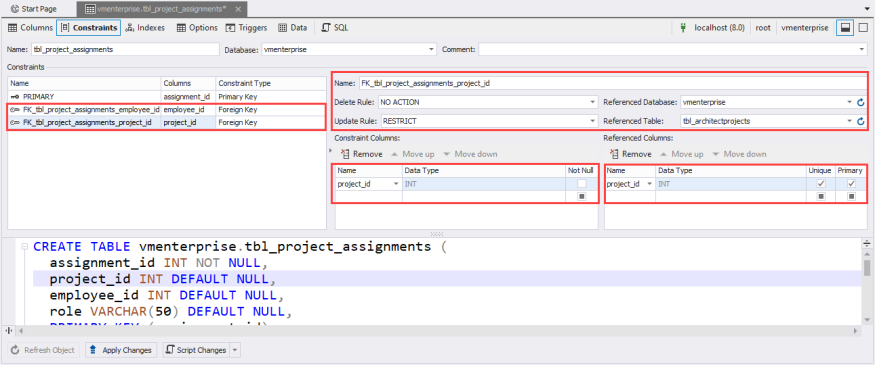
Similarly, create a foreign Key named FK_tbl_project_assignments_project_id the screenshot of the constraint looks like the following image.
Once the columns and constraints are defined, click Apply Changes to create a table.
The new tables are visible under the tables folder in the VMEnterprise database.
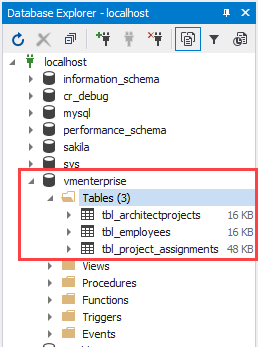
As you can see, the tables are created successfully.
Summary
This article taught us what is MySQL Table editor and what are the benefits of using it. I have explained various features that make dbForge Studio stand out from other feature-rich tools. Also, we learned how to create a new table in dbForge Studio for MySQL.
© 2026 ScienceTimes.com All rights reserved. Do not reproduce without permission. The window to the world of Science Times.


